Featured image of post BUAA-OS-lab1杂记

BUAA-OS-lab1杂记

初识mos内核

BUAA-OS-lab1杂记

字节序(byte order)

Little endian(小端)与Big endian(大端)

“endian”这个词出自 Jonathan Swin 在 1726 年写的讽刺小说《格列佛游记》( Guliver’s Travels ),小人国的内战就源于吃水煮鸡蛋时究竟是从大头(Big-Endian)敲开还是从小头(Little-Endian)敲开,由此曾发生过 6 次叛乱,其中一个皇帝送了命,另一个丢了王位。

MSB(most significant bit/byte)LSB(least significant bit/byte)

Little-endian 把MSB存放在高地址,Big-endian把MSB存放在低地址

例如0x12345678

0字节1字节2字节3字节
EL0x780x560x340x12
EB0x120x340x560x78

Big-endian在内存中的顺序比较符合数字的书写习惯,而Little-endian可以确保在变量指针转换的时候地址保持不变。比如uint32*转换为char*,只需要取0字节即可。

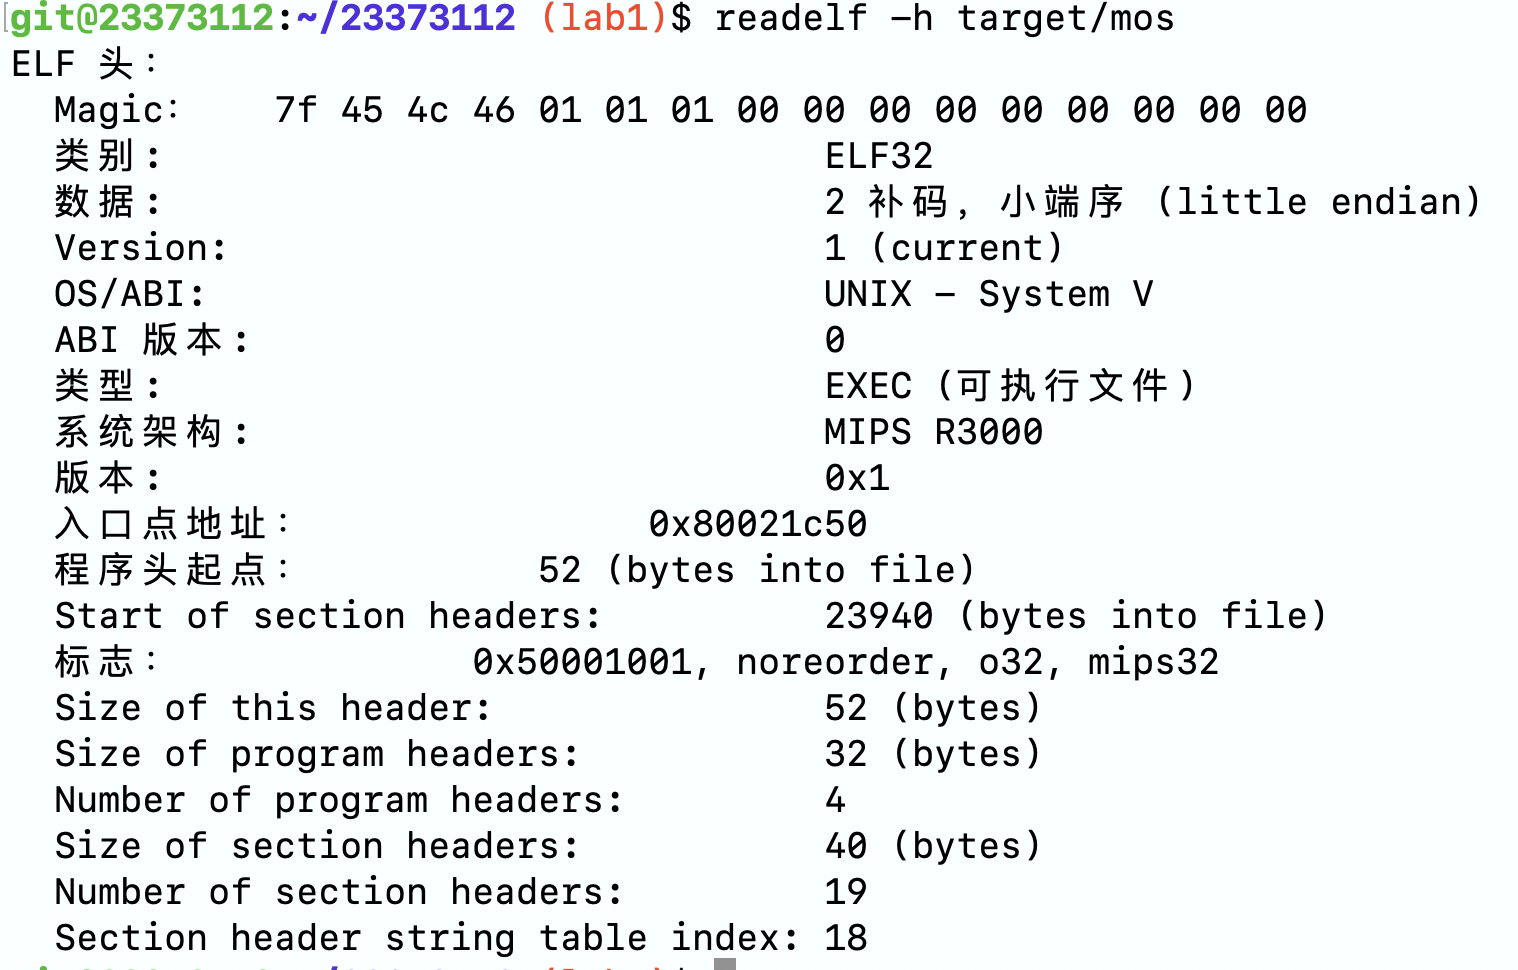
使用readelf -h可以查看elf header信息,可以看到mos操作系统是Little-endian的。

ELF

程序代码被编译和链接成包含二进制计算机指令的可执行文件。而可执行文件是有格式规范的,在 Linux 中,这个规范叫 Executable and Linkable format (ELF)。ELF 中包含二进制计算机指令、静态数据、元信息。

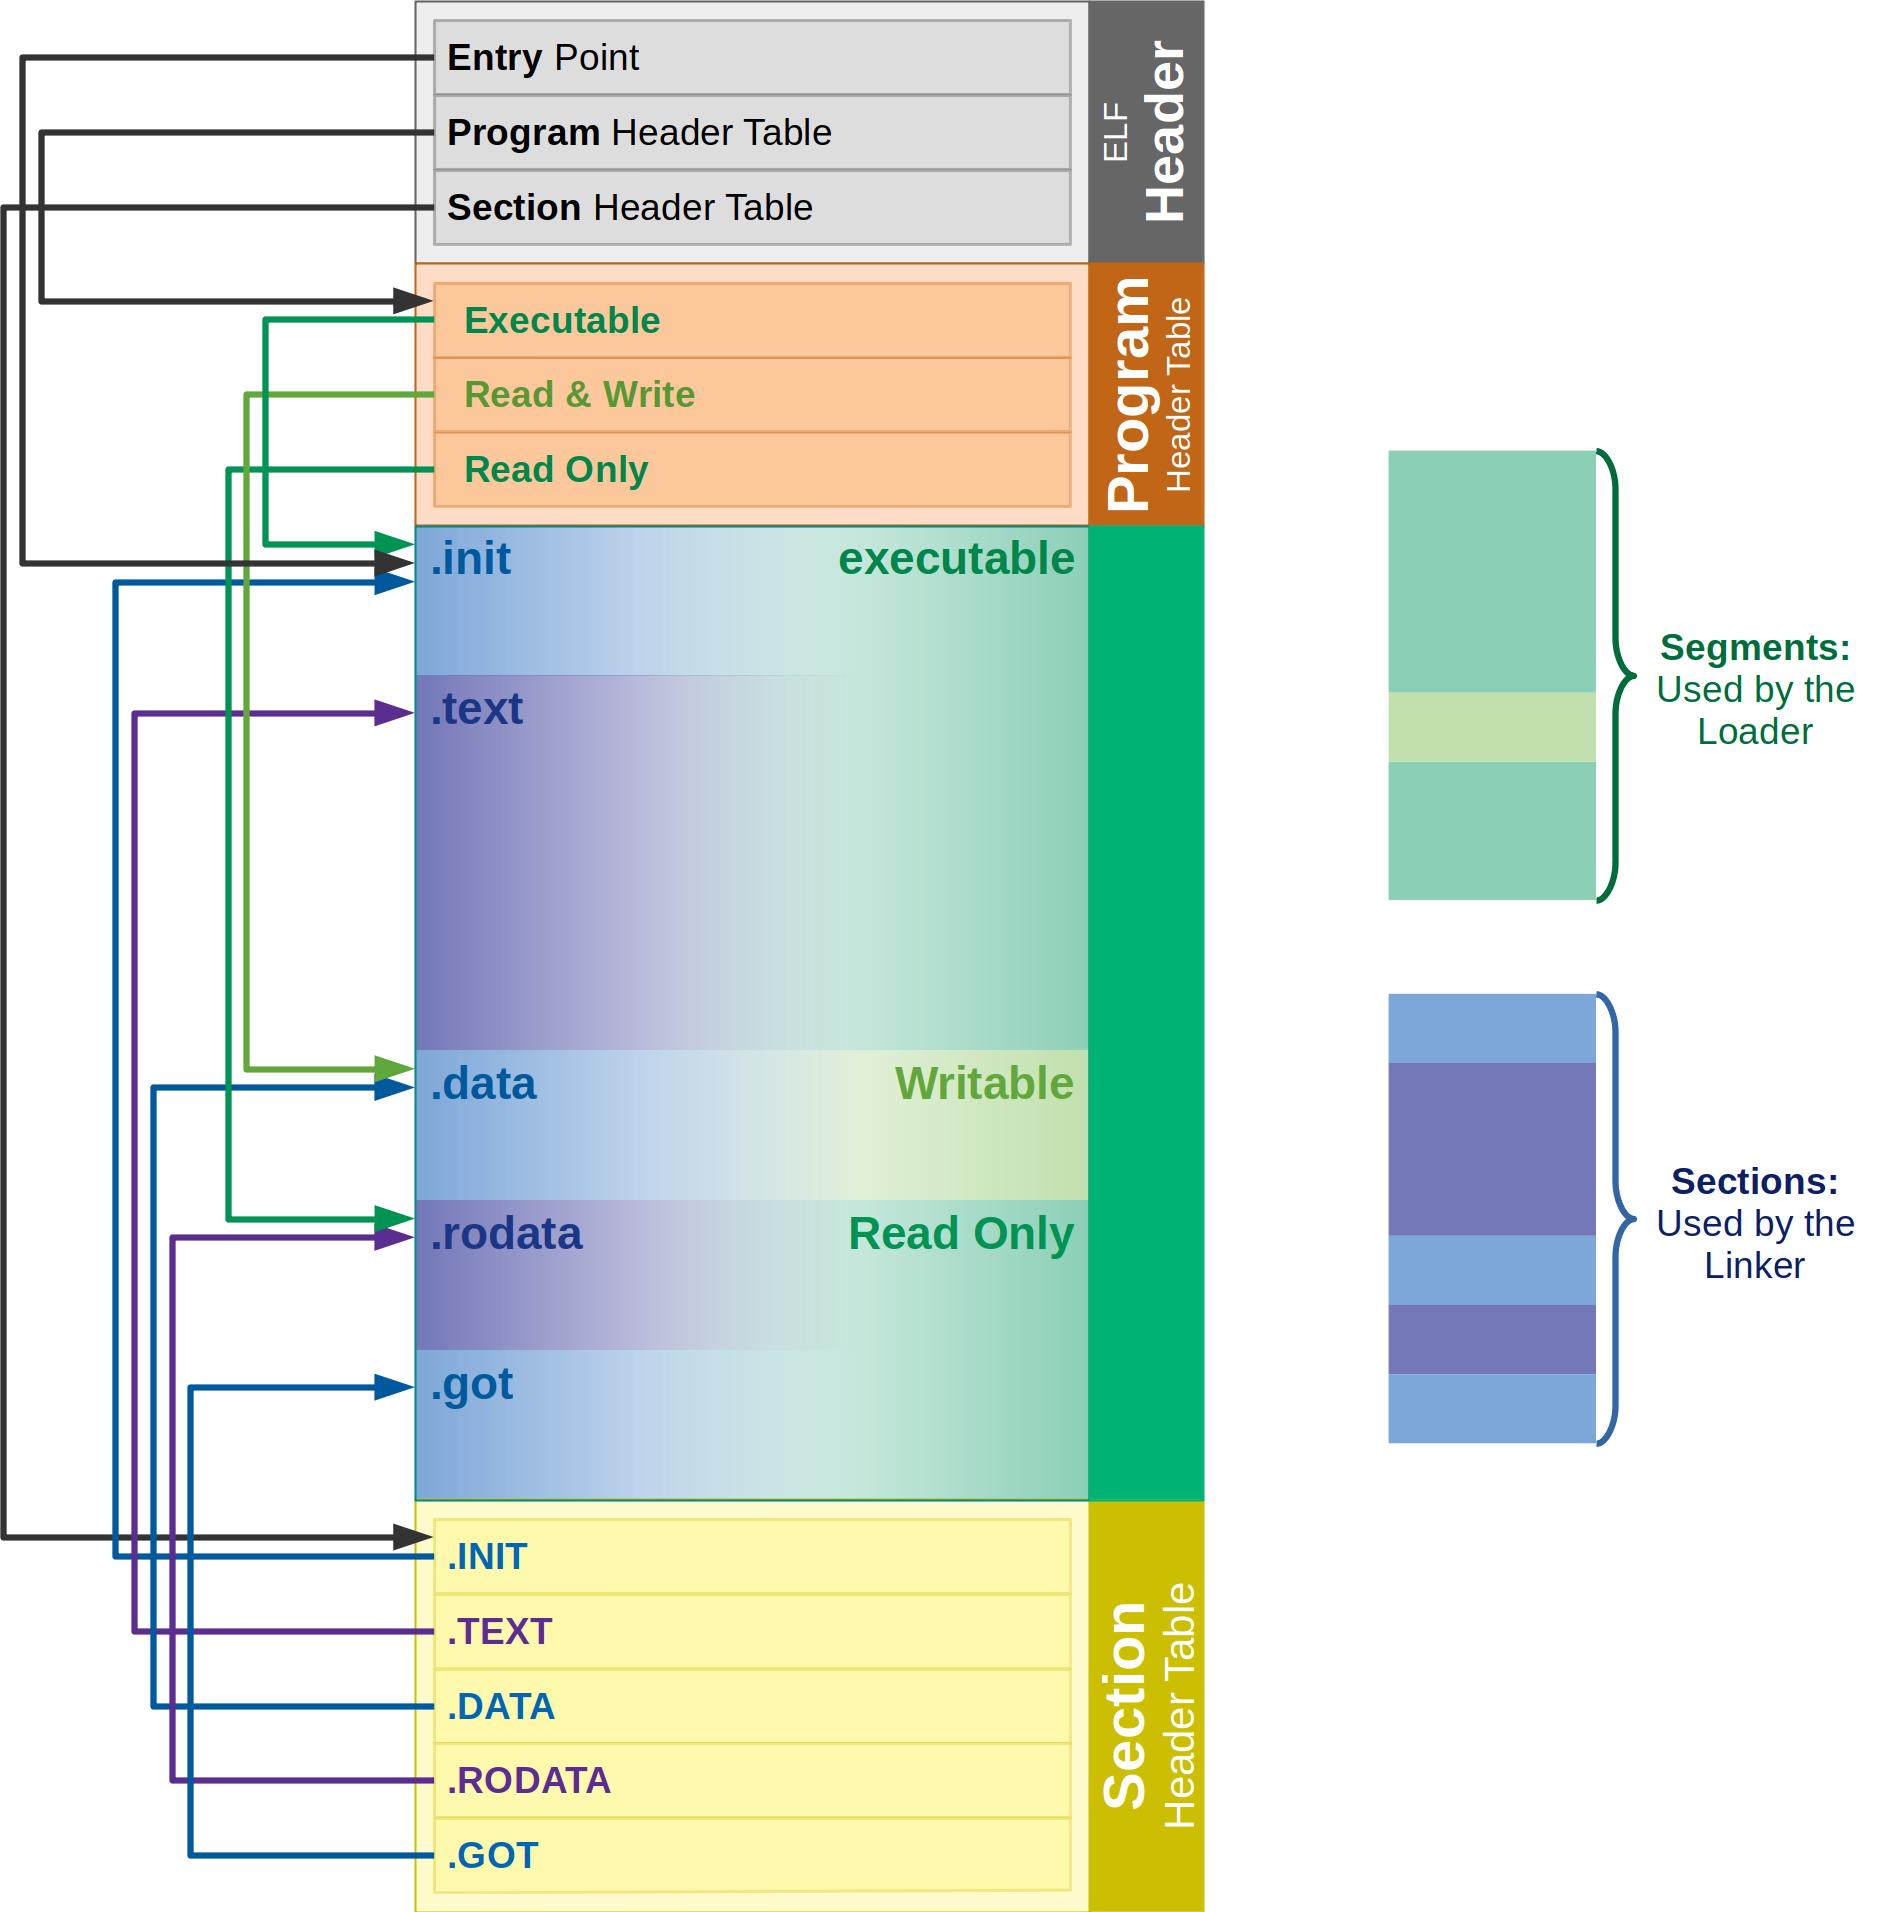
从ELF的全称可以看出,ELF文件有两个特性Executable可执行的和Linkable可链接的,对应的ELF文件有两种视角。

  • Linking view链接视角,节头表(section header table)包含了链接时所需的信息,告诉操作系统如何链接可执行文件,完成进程内存的初始化。
  • Execution view执行视角,段头表(program header table)包含了运行时加载程序所需的信息,告诉操作系统如何加载可执行文件,完成进程内存的初始化。一个可执行的ELF一定有program header table。

ELF有三种类型

  • relocatable 可重定位文件
  • executable 可执行文件
  • shared object 共享对象文件
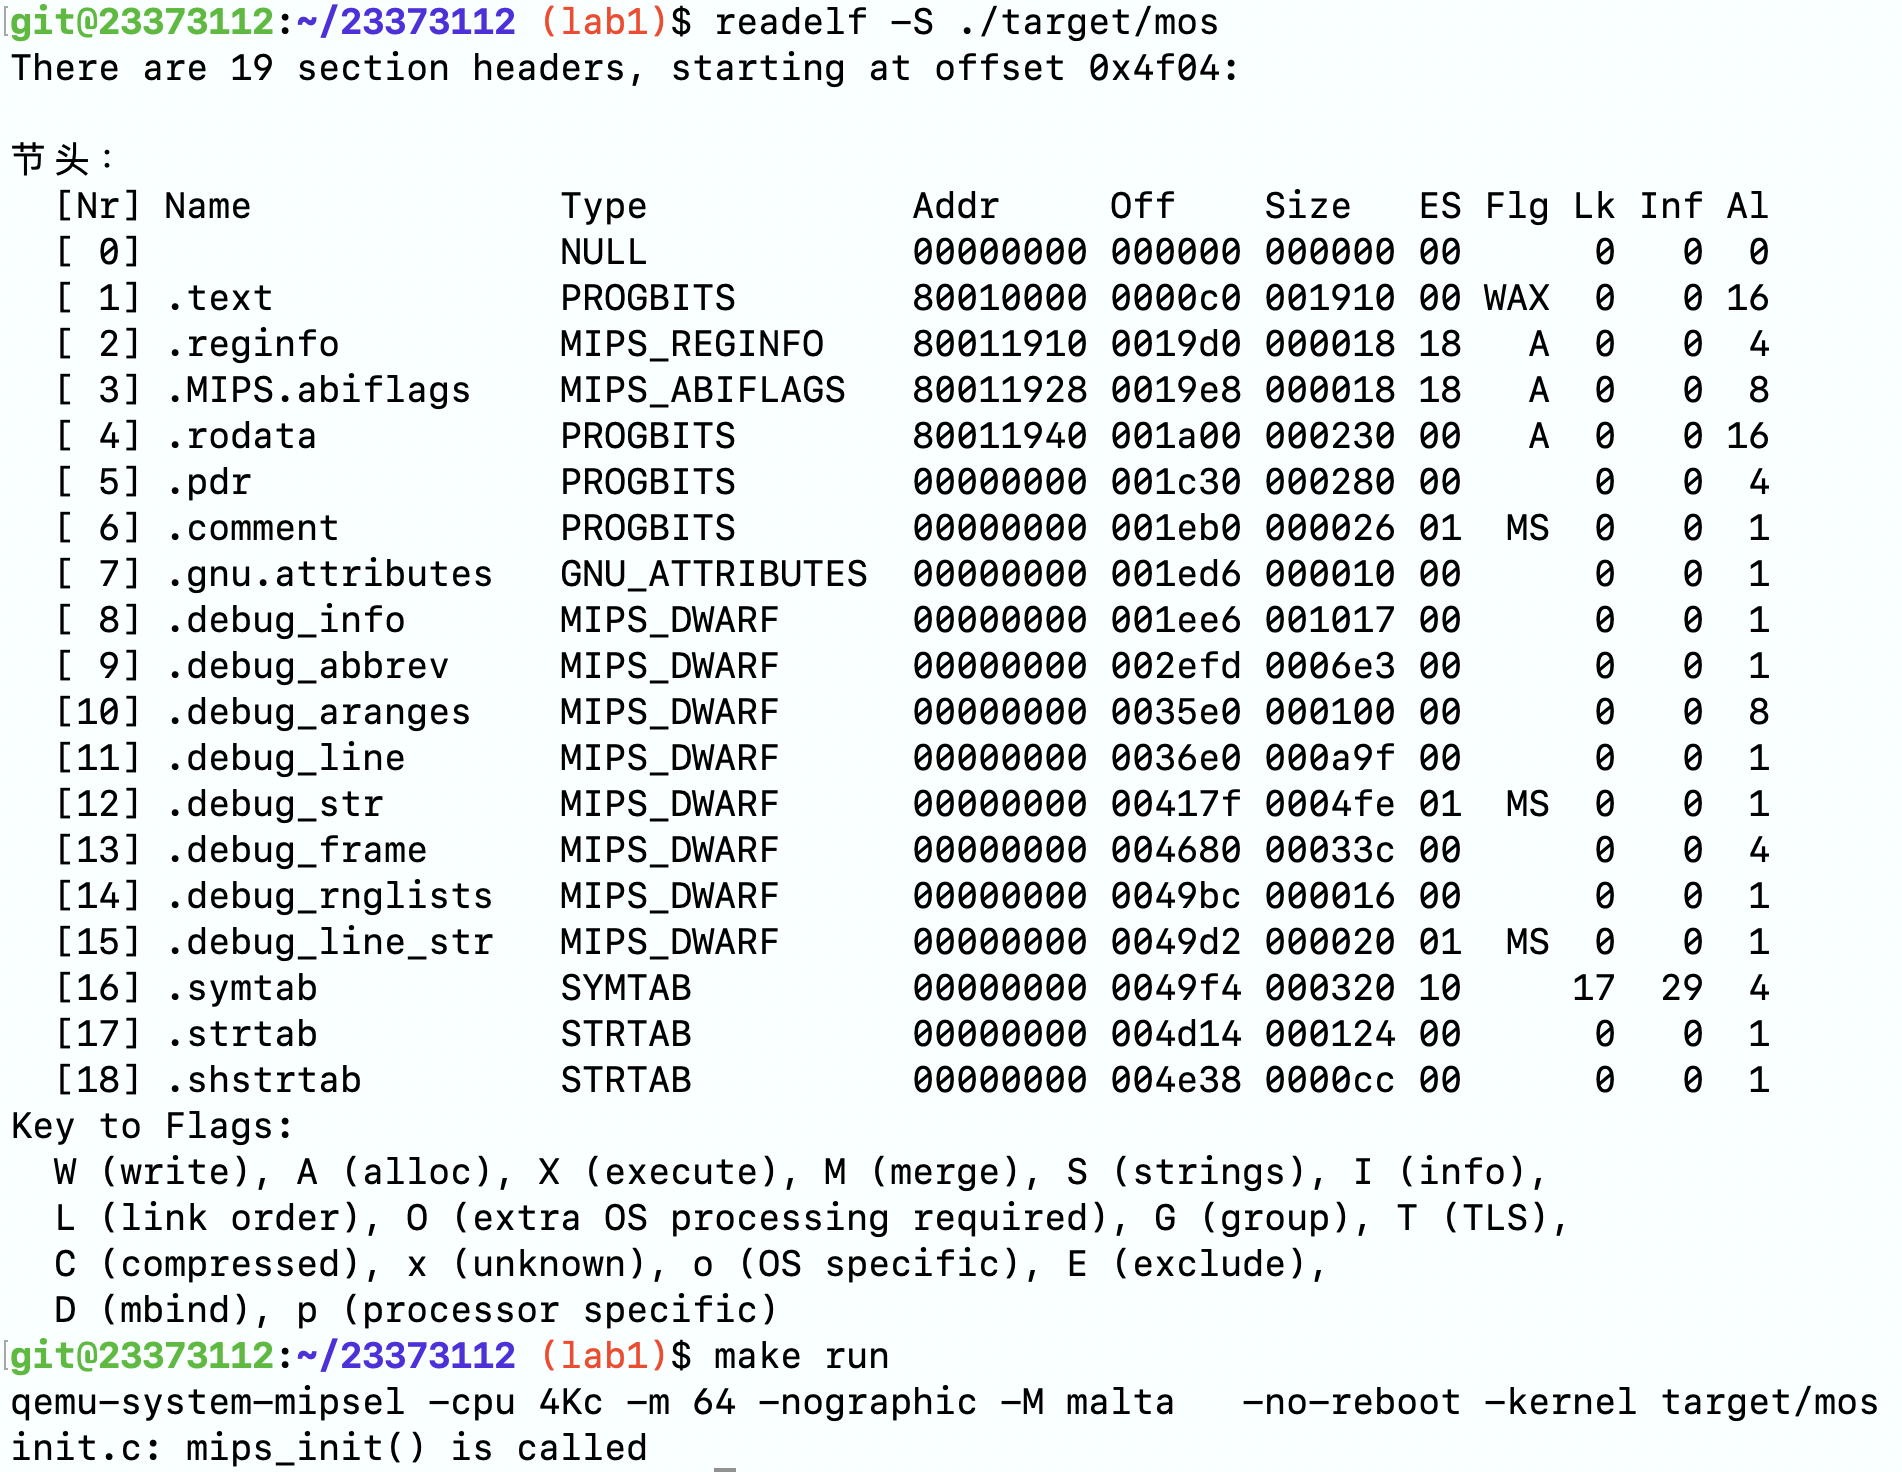
readelf

c语言中结构体就是一片连续的内存,elf.h文件里的结构体实际上是对内存的一种映射。

我们在main.c中获得了一个指向ELF文件二进制数据的指针p,接着我们要实现的就是根据ELF文件的结构去解析这些二进制数据。

解析之前我们需要先判断这些二进制数据是不是ELF文件。

先假设这些数据是ELF格式的(将指针转换为我们定义的Elf32_Ehdr去读取ELF的文件头),ELF文件头里的e_ident就是用于告诉外界这是一个ELF文件的,我们只需要判断e_ident里是不是特定内容即可。

1
2
3
4
5
6
int is_elf_format(const void *binary, size_t size) {
	Elf32_Ehdr *ehdr = (Elf32_Ehdr *)binary;
	return size >= sizeof(Elf32_Ehdr) && ehdr->e_ident[EI_MAG0] == ELFMAG0 &&
	       ehdr->e_ident[EI_MAG1] == ELFMAG1 && ehdr->e_ident[EI_MAG2] == ELFMAG2 &&
	       ehdr->e_ident[EI_MAG3] == ELFMAG3;
}
 1
 2
 3
 4
 5
 6
 7
 8
 9
10
11
12
13
14
15
16
17
18
19
20
21
22
23
24
25
26
27
28
29
30
31
32
typedef struct {
	unsigned char e_ident[EI_NIDENT]; /* Magic number and other info */
	Elf32_Half e_type;		  /* Object file type */
	Elf32_Half e_machine;		  /* Architecture */
	Elf32_Word e_version;		  /* Object file version */
	Elf32_Addr e_entry;		  /* Entry point virtual address */
	Elf32_Off e_phoff;		  /* Program header table file offset */
	Elf32_Off e_shoff;		  /* Section header table file offset */
	Elf32_Word e_flags;		  /* Processor-specific flags */
	Elf32_Half e_ehsize;		  /* ELF header size in bytes */
	Elf32_Half e_phentsize;		  /* Program header table entry size */
	Elf32_Half e_phnum;		  /* Program header table entry count */
	Elf32_Half e_shentsize;		  /* Section header table entry size */
	Elf32_Half e_shnum;		  /* Section header table entry count */
	Elf32_Half e_shstrndx;		  /* Section header string table index */
} Elf32_Ehdr;

/* Fields in the e_ident array.  The EI_* macros are indices into the
   array.  The macros under each EI_* macro are the values the byte
   may have.  */

#define EI_MAG0 0    /* File identification byte 0 index */
#define ELFMAG0 0x7f /* Magic number byte 0 */

#define EI_MAG1 1   /* File identification byte 1 index */
#define ELFMAG1 'E' /* Magic number byte 1 */

#define EI_MAG2 2   /* File identification byte 2 index */
#define ELFMAG2 'L' /* Magic number byte 2 */

#define EI_MAG3 3   /* File identification byte 3 index */
#define ELFMAG3 'F' /* Magic number byte 3 */

知道了这些二进制数据是一个ELF格式的文件之后我们就可以解析了。课程组需要我们实现的是解析section header table,我们该如何找到section header table呢?显然ELF文件头里已经告诉我们了,且还告诉了我们tabel里有几个header,每个header有多大,我们只需要在当前指针加上一个偏移量即可找到section header table。

为什么要把binary转换为char类型的指针?

假设偏移量为1,const void类型的指针不知道1指的是1字节还是1比特,而转换为char类型的指针指示就明确了偏移量的单位是一个char,即一字节。

 1
 2
 3
 4
 5
 6
 7
 8
 9
10
	// Get the address of the section table, the number of section headers and the size of a
	// section header.
	const void *sh_table;
	Elf32_Half sh_entry_count;
	Elf32_Half sh_entry_size;
	/* Exercise 1.1: Your code here. (1/2) */
	Elf32_Off sh_off = ehdr->e_shoff; // section header table file offset
	sh_entry_count = ehdr->e_shnum; // table entry num
	sh_entry_size = ehdr->e_shentsize; // size of each table entry 
	sh_table = (const void *)((char *)binary + sh_off); // move to section header

找到section header table之后输出每个header的地址即可。需要注意的是结构体Elf32_Shdr映射的是一个section header,移动指针的时候需要转换指针类型确保每次移动一个header的长度。

 1
 2
 3
 4
 5
 6
 7
 8
 9
10
	// For each section header, output its index and the section address.
	// The index should start from 0.
	for (int i = 0; i < sh_entry_count; i++) {
		const Elf32_Shdr *shdr;
		unsigned int addr;
		/* Exercise 1.1: Your code here. (2/2) */
		shdr = (const Elf32_Shdr *)sh_table + i;
		addr = shdr->sh_addr;
		printf("%d:0x%x\n", i, addr);
	}
 1
 2
 3
 4
 5
 6
 7
 8
 9
10
11
12
13
/* Section segment header.  */
typedef struct {
	Elf32_Word sh_name;	 /* Section name */
	Elf32_Word sh_type;	 /* Section type */
	Elf32_Word sh_flags;	 /* Section flags */
	Elf32_Addr sh_addr;	 /* Section addr */
	Elf32_Off sh_offset;	 /* Section offset */
	Elf32_Word sh_size;	 /* Section size */
	Elf32_Word sh_link;	 /* Section link */
	Elf32_Word sh_info;	 /* Section extra info */
	Elf32_Word sh_addralign; /* Section alignment */
	Elf32_Word sh_entsize;	 /* Section entry size */
} Elf32_Shdr;

加载内核文件

了解了ELF格式之后,我们就要开始学习如何我们的mos操作系统内核了。

对于32位处理器,MIPS体系结构中的虚拟内存为4GB。

课程组已经贴心地给出了内存图,我们只需要把各部分放到正确的地址即可。

根据内存图,我们把.text放到kernel text处(0x80020000),.data和.bss依次放置即可。

  • .text 保存可执行文件的操作指令。

  • .data 保存已初始化的全局变量和静态变量。

  • .bss 保存未初始化的全局变量和静态变量。

.text .data .bss是ELF中比较重要的三个section。

 1
 2
 3
 4
 5
 6
 7
 8
 9
10
11
12
13
14
15
16
17
18
19
20
21
22
23
24
25
26
27
28
29
30
31
32
33
34
35
36
37
38
39
40
41
42
43
44
/*
 o     4G ----------->  +----------------------------+------------0x100000000
 o                      |       ...                  |  kseg2
 o      KSEG2    -----> +----------------------------+------------0xc000 0000
 o                      |          Devices           |  kseg1
 o      KSEG1    -----> +----------------------------+------------0xa000 0000
 o                      |      Invalid Memory        |   /|\
 o                      +----------------------------+----|-------Physical Memory Max
 o                      |       ...                  |  kseg0
 o      KSTACKTOP-----> +----------------------------+----|-------0x8040 0000-------end
 o                      |       Kernel Stack         |    | KSTKSIZE            /|\
 o                      +----------------------------+----|------                |
 o                      |       Kernel Text          |    |                    PDMAP
 o      KERNBASE -----> +----------------------------+----|-------0x8002 0000    |
 o                      |      Exception Entry       |   \|/                    \|/
 o      ULIM     -----> +----------------------------+------------0x8000 0000-------
 o                      |         User VPT           |     PDMAP                /|\
 o      UVPT     -----> +----------------------------+------------0x7fc0 0000    |
 o                      |           pages            |     PDMAP                 |
 o      UPAGES   -----> +----------------------------+------------0x7f80 0000    |
 o                      |           envs             |     PDMAP                 |
 o  UTOP,UENVS   -----> +----------------------------+------------0x7f40 0000    |
 o  UXSTACKTOP -/       |     user exception stack   |     PTMAP                 |
 o                      +----------------------------+------------0x7f3f f000    |
 o                      |                            |     PTMAP                 |
 o      USTACKTOP ----> +----------------------------+------------0x7f3f e000    |
 o                      |     normal user stack      |     PTMAP                 |
 o                      +----------------------------+------------0x7f3f d000    |
 a                      |                            |                           |
 a                      ~~~~~~~~~~~~~~~~~~~~~~~~~~~~~~                           |
 a                      .                            .                           |
 a                      .                            .                         kuseg
 a                      .                            .                           |
 a                      |~~~~~~~~~~~~~~~~~~~~~~~~~~~~|                           |
 a                      |                            |                           |
 o       UTEXT   -----> +----------------------------+------------0x0040 0000    |
 o                      |      reserved for COW      |     PTMAP                 |
 o       UCOW    -----> +----------------------------+------------0x003f f000    |
 o                      |   reversed for temporary   |     PTMAP                 |
 o       UTEMP   -----> +----------------------------+------------0x003f e000    |
 o                      |       invalid memory       |                          \|/
 a     0 ------------>  +----------------------------+ ----------------------------
 o
*/
SECTIONS {
	/* Exercise 3.10: Your code here. */

	/* fill in the correct address of the key sections: text, data, bss. */
	/* Hint: The loading address can be found in the memory layout. And the data section
	 *       and bss section are right after the text section, so you can just define
	 *       them after the text section.
	 */
	/* Step 1: Set the loading address of the text section to the location counter ".". */
	/* Exercise 1.2: Your code here. (1/4) */
	. = 0x80020000;
	/* Step 2: Define the text section. */
	/* Exercise 1.2: Your code here. (2/4) */
	.text : { *(.text) }
	/* Step 3: Define the data section. */
	/* Exercise 1.2: Your code here. (3/4) */
	.data : { *(.data) }
	bss_start = .;
	/* Step 4: Define the bss section. */
	/* Exercise 1.2: Your code here. (4/4) */
	.bss : { *(.bss) }
	bss_end = .;
	. = 0x80400000;
	end = . ;
}

其实内存布局并不像内存图画的那样界限分明,.text放到其他地方也是可以正常运行的,比如把.text放到0x80010000也是可以正常运行的,不过最好遵循课程组的要求。

内核入口

在把对应的section加载到正确的位置后,我们需要考虑如何启动内核。第一步当然是找到内核的入口了。

打开init目录下的start.S,补全我们的代码,将 sp 寄存器设置到内核栈空间的位置上,随后跳转到 mips_init 函数。

在kernel.lds文件中我们看到这样一行,其作用是告诉链接器程序的入口地址,即程序执行的第一条指令的地址。

1
ENTRY(_start)

那么这个_start在哪呢?在start.S文件中我们看到这样一行,其作用是声明一个全局符号_start,使链接器能找到_start。

1
EXPORT(_start)

在include/asm/asm.h文件下我们可以看到EXPORT宏的展开形式。

1
2
3
#define EXPORT(symbol)                                                                             \
	.globl symbol;                                                                             \
	symbol:

继续往下看,我们看到以下两行代码

1
2
.set at
.set reorder

在上学期的co中,我们在mars里一定看到过一个叫$at的寄存器,其全称是Assembler Temporary,即临时寄存器。

在mips中有一些指令本身并不是 MIPS 硬件支持的原生指令,而是由汇编器自动翻译成一条或多条真正的 MIPS 指令。比如li指令。

1
li $t0, 0x12345678  # 伪指令

这条指令会被汇编器翻译为

1
2
lui $at, 0x1234
ori $t0, $at, 0x5678

这里就用到了at寄存器。.set at指令就是告诉汇编器允许使用at寄存器进行伪指令展开。如果使用了.set noat,那么汇编器再遇到需要使用到at寄存器的伪指令时会报错。

在co中我们对流水线印象深刻。我们知道一些指令会在不影响结果的情况下被放到延迟槽里执行,这项工作也是由汇编器来完成的,.set reorder指令就是允许汇编器对指令进行重排的,我们也可以使用.set noreorder来禁止汇编器的重排行为。

完成了一些初始化设置之后,start.S文件会先对.bss区域进行清零操作,即未初始化的全局变量和静态变量初始值为0。这里我们回顾一下c语言中的变量类型。

  • static类型的int变量存储在.bss(未初始化)和.data(已初始化)生命周期是从主程序的开始到结束,我们每次调用func函数变量c和d都会自增1。需要注意的是,虽然它们的生命周期是整个程序的运行周期,但它们只在其定义的函数内可访问。
  • 普通类型的int变量存储在栈上,其生命周期是从函数的开始到结束,每次进入 func() 时会重新分配内存,并在函数返回时销毁。
  • 普通类型的变量如何没有初始化其数值是不确定的,static类型的变量如果未初始化其数值默认为0。
 1
 2
 3
 4
 5
 6
 7
 8
 9
10
11
12
13
14
15
16
17
18
19
20
21
22
23
24
25
26
#include<stdio.h>
int a = 5;	// staged in .data
int b;		// staged in .bss

void func() {
	static int c = 1;	// staged in .data
	c++;
	static int d;		// staged in .bss
	d++;
	int e = 7;		// staged in stack
	e++;
	int f;			// staged in stack
	f++;
	printf("c is %d\n", c);
	printf("d is %d\n", d);
	printf("e is %d\n", e);
	printf("f is %d\n\n", f);

}

int main() {
	func();
	func();
	func();
	return 0;
}
 1
 2
 3
 4
 5
 6
 7
 8
 9
10
11
12
13
14
15
git@23373112:~/learnClang $ gcc main.c -o main && ./main
c is 2
d is 1
e is 8
f is 32677

c is 3
d is 2
e is 8
f is 32678

c is 4
d is 3
e is 8
f is 32679

.bss清零结束之后,程序会先把CP0状态置为0禁用中断,确保内核的初始化不会被打断,然后把栈指针放到正确的位置,最后跳转到mips_init(init/init.c文件中),对于lab1,mips_init只有打印的功能。

 1
 2
 3
 4
 5
 6
 7
 8
 9
10
11
12
13
14
15
16
17
18
19
20
21
22
23
24
25
26
27
28
29
30
31
32
void mips_init(u_int argc, char **argv, char **penv, u_int ram_low_size) {
	printk("init.c:\tmips_init() is called\n");

	// lab2:
	// mips_detect_memory(ram_low_size);
	// mips_vm_init();
	// page_init();

	// lab3:
	// env_init();

	// lab3:
	// ENV_CREATE_PRIORITY(user_bare_loop, 1);
	// ENV_CREATE_PRIORITY(user_bare_loop, 2);

	// lab4:
	// ENV_CREATE(user_tltest);
	// ENV_CREATE(user_fktest);
	// ENV_CREATE(user_pingpong);

	// lab6:
	// ENV_CREATE(user_icode);  // This must be the first env!

	// lab5:
	// ENV_CREATE(user_fstest);
	// ENV_CREATE(fs_serv);  // This must be the second env!
	// ENV_CREATE(user_devtst);

	// lab3:
	// schedule(0);
	halt();
}

我们在内存图中可以找到kernel stack的位置,但是为什么栈帧要设置在kernel stack的栈顶(KSTACKTOP = 0x8004000)?

进程地址的分布取决于操作系统,栈向什么方向增长取决于操作系统与CPU的组合。

是否还记得上学期计算机组成原理中mips是如何在调用函数前保护和恢复寄存器的,是先$sp自减再$sp自增,表明对于mips指令集栈的生长方向是由高地址向低地址生长的。

至于为什么要这样设定,更多的是历史原因,许多早期处理器在基址寄存器寻址时仅支持无符号偏移,因此如果栈向低地址增长,相对栈指针的地址计算更高效。

 1
 2
 3
 4
 5
 6
 7
 8
 9
10
11
12
13
14
15
16
17
18
19
20
21
22
23
24
25
26
27
28
29
#include <asm/asm.h>
#include <mmu.h>

.text
EXPORT(_start)
.set at
.set reorder
/* Lab 1 Key Code "enter-kernel" */
	/* clear .bss segment */
	la      v0, bss_start
	la      v1, bss_end
clear_bss_loop:
	beq     v0, v1, clear_bss_done
	sb      zero, 0(v0)
	addiu   v0, v0, 1
	j       clear_bss_loop
/* End of Key Code "enter-kernel" */

clear_bss_done:
	/* disable interrupts */
	mtc0    zero, CP0_STATUS

	/* hint: you can refer to the memory layout in include/mmu.h */
	/* set up the kernel stack */
	/* Exercise 1.3: Your code here. (1/2) */
	la sp, KSTACKTOP
	/* jump to mips_init */
	/* Exercise 1.3: Your code here. (2/2) */
	j mips_init

printk

调用链

完成了之前的工作,我们的内核已经能正常启动了,现在要做的是实现打印功能,即完成printk函数,使mips_init中的printk函数能正确被调用。

观察init.c的头文件声明部分。

1
2
3
4
5
6
#include <asm/asm.h>
#include <env.h>
#include <pmap.h>
#include <printk.h>
#include <sched.h>
#include <trap.h>

显然printk函数的声明在printk.h文件中,下面我们来分析printk.h代码。

 1
 2
 3
 4
 5
 6
 7
 8
 9
10
11
12
13
14
15
16
17
18
19
20
21
22
23
24
25
26
27
# include/printk.h

#ifndef _printk_h_
#define _printk_h_

#include <machine.h>
#include <stdarg.h>

void printk(const char *fmt, ...);

void _panic(const char *, int, const char *, const char *, ...)
#ifdef MOS_HANG_ON_PANIC
    __attribute__((noreturn))
#endif
    ;

#define panic(...) _panic(__FILE__, __LINE__, __func__, __VA_ARGS__)

#define panic_on(expr)                                                                             \
	do {                                                                                       \
		int _r = (expr);                                                                   \
		if (_r != 0) {                                                                     \
			panic("'" #expr "' returned %d", _r);                                      \
		}                                                                                  \
	} while (0)

#endif /* _printk_h_ */

头文件声明部分

1
2
3
4
#ifndef _printk_h_
#define _printk_h_
// 头文件内容
#endif /* _printk_h_ */

如果_printk_h_没有被定义则定义_printk_h_,避免重复头文件被重复包含。

函数声明部分,panic函数是用来处理错误的函数,这里不做过多的解释。

1
void printk(const char *fmt, ...);

在开发与操作系统内核相关的项目,printk 是内核提供的函数(其中k就是kernel的意思)。此处只有声明没有实现,具体实现在kern/printk.c中。

 1
 2
 3
 4
 5
 6
 7
 8
 9
10
11
12
13
14
15
16
17
18
19
20
21
22
23
24
25
26
27
28
29
30
31
32
33
34
# kern/printk.c

#include <print.h>
#include <printk.h>
#include <trap.h>

/* Lab 1 Key Code "outputk" */
void outputk(void *data, const char *buf, size_t len) {
	for (int i = 0; i < len; i++) {
		printcharc(buf[i]);
	}
}
/* End of Key Code "outputk" */

/* Lab 1 Key Code "printk" */
void printk(const char *fmt, ...) {
	va_list ap;
	va_start(ap, fmt);
	vprintfmt(outputk, NULL, fmt, ap);
	va_end(ap);
}
/* End of Key Code "printk" */

void print_tf(struct Trapframe *tf) {
	for (int i = 0; i < sizeof(tf->regs) / sizeof(tf->regs[0]); i++) {
		printk("$%2d = %08x\n", i, tf->regs[i]);
	}
	printk("HI  = %08x\n", tf->hi);
	printk("LO  = %08x\n\n", tf->lo);
	printk("CP0.SR    = %08x\n", tf->cp0_status);
	printk("CP0.BadV  = %08x\n", tf->cp0_badvaddr);
	printk("CP0.Cause = %08x\n", tf->cp0_cause);
	printk("CP0.EPC   = %08x\n", tf->cp0_epc);
}

然后我们发现printk函数又调用了vprintfmt函数,继续跳转到vprintfmt的实现(include/print.h)。

 1
 2
 3
 4
 5
 6
 7
 8
 9
10
11
12
13
14
15
16
17
18
19
20
21
22
23
24
25
26
27
28
29
30
31
32
33
34
35
# include/print.h

#ifndef _print_h_
#define _print_h_

#include <stdarg.h>
#include <types.h>

typedef void (*fmt_callback_t)(void *data, const char *buf, size_t len);

/* Lab 1 Key Code "vprintfmt-overview" */
/*
 * 'vprintfmt' is a formatting function that allows different backends (i.e., output sinks)
 * to be used for printing. It takes four arguments:
 *
 * - 'fmt_callback_t out': a function pointer to the output sink that receives the
 *   formatted output generated by 'vprintfmt'.
 * - 'void *data': a context pointer passed to the 'out' callback function. It can be used
 *   to store additional output sink-specific data.
 * - 'const char *fmt': the format string, similar to the format string in 'printf'.
 * - 'va_list ap': a variadic argument list that provides the arguments to be formatted.
 *
 * The format callback function 'out' receives the following arguments:
 *
 * - 'void *data': the same 'data' pointer passed to 'vprintfmt'.
 * - 'const char *buf': a pointer to a buffer containing the formatted output.
 * - 'size_t len': the number of bytes in the buffer.
 *
 * Note that the buffer may not be null-terminated and may contain embedded null bytes,
 * so the output sink should treat 'len' as the actual length of the buffer to print.
 */
void vprintfmt(fmt_callback_t out, void *data, const char *fmt, va_list ap);
/* End of Key Code "vprintfmt-overview" */

#endif

typedef 定义了一个名为 fmt_callback_t 的类型,它是一个函数指针类型,指向一个接受 void *dataconst char *bufsize_t len 作为参数的函数。

截止又是只声明了vprintfmt函数但是没有实现,我们继续找,在lib目录下的print.c文件中我们终于找到了vprintfmt的实现,也正是我们需要填空的部分。

先解释下函数名vprintfmt,v代表"variadic"(可变参数),fmt代表format格式化,即这是一个支持可变参数并且进行格式化输出的函数。

再来看vprintfmt的传入参数

  • fmt_callback_t out回调函数,往前追溯我们发现这个参数在调用时传入的是outputk函数,即遍历buf,每次输出一个char。我们可以理解为一个无格式好打印字符串的函数。
  • void *data指向任意类型的指针,可以用于传递给回调函数的上下文信息。在回调函数中,data 可以用来存储或传递与输出相关的附加数据(比如输出目的地、日志上下文等),但是在lab1中并没有涉及相关处理。
  • const char *fmt格式化字符串,也就是类似"a is %d"这样带有%d等占位符的字符串。
  • va_list ap可变参数列表,包含我们用来替换占位符的数据。

我们要做的就是解析格式化字符串fmt,将其中%[flags][width][length]<specifier>形式的格式符替换为正确的字符串,具体代码如下,遇到%就将之前的字符串输出,然后解析格式符利用已有函数输出(print_num、print_char等等),直到遇到\0结束循环。

  1
  2
  3
  4
  5
  6
  7
  8
  9
 10
 11
 12
 13
 14
 15
 16
 17
 18
 19
 20
 21
 22
 23
 24
 25
 26
 27
 28
 29
 30
 31
 32
 33
 34
 35
 36
 37
 38
 39
 40
 41
 42
 43
 44
 45
 46
 47
 48
 49
 50
 51
 52
 53
 54
 55
 56
 57
 58
 59
 60
 61
 62
 63
 64
 65
 66
 67
 68
 69
 70
 71
 72
 73
 74
 75
 76
 77
 78
 79
 80
 81
 82
 83
 84
 85
 86
 87
 88
 89
 90
 91
 92
 93
 94
 95
 96
 97
 98
 99
100
101
102
103
104
105
106
107
108
109
110
111
112
113
114
115
116
117
118
119
120
121
122
123
124
125
126
127
128
129
130
131
132
133
134
135
136
137
138
139
140
141
142
143
144
145
146
147
148
149
150
151
152
153
154
155
156
157
158
159
160
161
162
163
164
165
166
167
168
169
170
171
172
173
174
175
176
177
178
179
180
181
182
183
184
185
186
187
188
189
190
191
192
193
194
195
196
197
198
199
200
201
202
203
204
205
206
207
208
209
210
211
212
213
214
215
216
217
218
219
220
221
222
223
224
225
226
227
228
229
230
231
232
233
234
235
236
237
238
239
240
241
242
243
244
245
246
247
248
249
250
251
252
253
254
255
256
257
258
259
260
261
262
263
264
265
266
267
268
269
270
271
272
273
274
275
276
277
278
279
280
281
282
283
# lib/print.c

#include <print.h>

/* forward declaration */
static void print_char(fmt_callback_t, void *, char, int, int);
static void print_str(fmt_callback_t, void *, const char *, int, int);
static void print_num(fmt_callback_t, void *, unsigned long, int, int, int, int, char, int);

void vprintfmt(fmt_callback_t out, void *data, const char *fmt, va_list ap) {
	char c;
	const char *s;
	long num;

	int width;
	int long_flag; // output is long (rather than int)
	int neg_flag;  // output is negative
	int ladjust;   // output is left-aligned
	char padc;     // padding char

	for (;;) {
		/* scan for the next '%' */
		/* Exercise 1.4: Your code here. (1/8) */
		const char *p = fmt;
		while (*p != '%' && *p != '\0') {
			p++;
		}

		/* flush the string found so far */
		/* Exercise 1.4: Your code here. (2/8) */
		out(data, fmt, p - fmt);
		fmt = p;

		/* check "are we hitting the end?" */
		/* Exercise 1.4: Your code here. (3/8) */
		if (*fmt == '\0') {
			break;
		}

		/* we found a '%' */
		/* Exercise 1.4: Your code here. (4/8) */
		fmt++;

		/* check format flag */
		/* Exercise 1.4: Your code here. (5/8) */
		ladjust = 0;
		padc = ' ';
		if (*fmt == '-') {
			ladjust = 1;
			fmt++;
		} else if (*fmt == '0') {
			padc = '0';
			fmt++;
		}

		/* get width */
		/* Exercise 1.4: Your code here. (6/8) */
		width = 0;
		while (*fmt >= '0' && *fmt <= '9' && *fmt != '\0') {
			width *= 10;
			width += *fmt - '0';
			fmt++;
		}

		/* check for long */
		/* Exercise 1.4: Your code here. (7/8) */
		long_flag = 0;
		if (*fmt == 'l') {
			long_flag = 1;
			fmt++;
		}

		neg_flag = 0;
		switch (*fmt) {
		case 'b':
			if (long_flag) {
				num = va_arg(ap, long int);
			} else {
				num = va_arg(ap, int);
			}
			print_num(out, data, num, 2, 0, width, ladjust, padc, 0);
			break;

		case 'd':
		case 'D':
			if (long_flag) {
				num = va_arg(ap, long int);
			} else {
				num = va_arg(ap, int);
			}

			/*
			 * Refer to other parts (case 'b', case 'o', etc.) and func 'print_num' to
			 * complete this part. Think the differences between case 'd' and the
			 * others. (hint: 'neg_flag').
			 */
			/* Exercise 1.4: Your code here. (8/8) */
			if (num < 0) {
				neg_flag = 1;
				num = -num;
			}
			print_num(out, data, num, 10, neg_flag, width, ladjust, padc, 0);
			break;

		case 'o':
		case 'O':
			if (long_flag) {
				num = va_arg(ap, long int);
			} else {
				num = va_arg(ap, int);
			}
			print_num(out, data, num, 8, 0, width, ladjust, padc, 0);
			break;

		case 'u':
		case 'U':
			if (long_flag) {
				num = va_arg(ap, long int);
			} else {
				num = va_arg(ap, int);
			}
			print_num(out, data, num, 10, 0, width, ladjust, padc, 0);
			break;

		case 'x':
			if (long_flag) {
				num = va_arg(ap, long int);
			} else {
				num = va_arg(ap, int);
			}
			print_num(out, data, num, 16, 0, width, ladjust, padc, 0);
			break;

		case 'X':
			if (long_flag) {
				num = va_arg(ap, long int);
			} else {
				num = va_arg(ap, int);
			}
			print_num(out, data, num, 16, 0, width, ladjust, padc, 1);
			break;

		case 'c':
			c = (char)va_arg(ap, int);
			print_char(out, data, c, width, ladjust);
			break;

		case 's':
			s = (char *)va_arg(ap, char *);
			print_str(out, data, s, width, ladjust);
			break;

		case '\0':
			fmt--;
			break;

		default:
			/* output this char as it is */
			out(data, fmt, 1);
		}
		fmt++;
	}
}

/* --------------- local help functions --------------------- */
void print_char(fmt_callback_t out, void *data, char c, int length, int ladjust) {
	int i;

	if (length < 1) {
		length = 1;
	}
	const char space = ' ';
	if (ladjust) {
		out(data, &c, 1);
		for (i = 1; i < length; i++) {
			out(data, &space, 1);
		}
	} else {
		for (i = 0; i < length - 1; i++) {
			out(data, &space, 1);
		}
		out(data, &c, 1);
	}
}

void print_str(fmt_callback_t out, void *data, const char *s, int length, int ladjust) {
	int i;
	int len = 0;
	const char *s1 = s;
	while (*s1++) {
		len++;
	}
	if (length < len) {
		length = len;
	}

	if (ladjust) {
		out(data, s, len);
		for (i = len; i < length; i++) {
			out(data, " ", 1);
		}
	} else {
		for (i = 0; i < length - len; i++) {
			out(data, " ", 1);
		}
		out(data, s, len);
	}
}

void print_num(fmt_callback_t out, void *data, unsigned long u, int base, int neg_flag, int length,
	       int ladjust, char padc, int upcase) {
	/* algorithm :
	 *  1. prints the number from left to right in reverse form.
	 *  2. fill the remaining spaces with padc if length is longer than
	 *     the actual length
	 *     TRICKY : if left adjusted, no "0" padding.
	 *		    if negtive, insert  "0" padding between "0" and number.
	 *  3. if (!ladjust) we reverse the whole string including paddings
	 *  4. otherwise we only reverse the actual string representing the num.
	 */

	int actualLength = 0;
	char buf[length + 70];
	char *p = buf;
	int i;

	do {
		int tmp = u % base;
		if (tmp <= 9) {
			*p++ = '0' + tmp;
		} else if (upcase) {
			*p++ = 'A' + tmp - 10;
		} else {
			*p++ = 'a' + tmp - 10;
		}
		u /= base;
	} while (u != 0);

	if (neg_flag) {
		*p++ = '-';
	}

	/* figure out actual length and adjust the maximum length */
	actualLength = p - buf;
	if (length < actualLength) {
		length = actualLength;
	}

	/* add padding */
	if (ladjust) {
		padc = ' ';
	}
	if (neg_flag && !ladjust && (padc == '0')) {
		for (i = actualLength - 1; i < length - 1; i++) {
			buf[i] = padc;
		}
		buf[length - 1] = '-';
	} else {
		for (i = actualLength; i < length; i++) {
			buf[i] = padc;
		}
	}

	/* prepare to reverse the string */
	int begin = 0;
	int end;
	if (ladjust) {
		end = actualLength - 1;
	} else {
		end = length - 1;
	}

	/* adjust the string pointer */
	while (end > begin) {
		char tmp = buf[begin];
		buf[begin] = buf[end];
		buf[end] = tmp;
		begin++;
		end--;
	}

	out(data, buf, length);
}

回顾一下整个调用链

1
2
graph TD
    printk --> include/printk.h --> kern/printk.c --> include/print.h --> lib/print.c
  • include目录:目录通常包含所有的头文件,这些头文件提供了函数声明、宏、结构体定义和常量等,这些头文件为内核的各个模块提供了接口,使得不同模块之间可以共享信息和功能。
  • kern目录:通常包含与内核核心功能(如进程调度、内存管理、系统调用等)相关的实现代码。它主要是内核的实现部分。
  • lib目录:包含实现内核中通用功能和服务的库函数。它通常存放一些通用的辅助代码,这些代码可以被多个内核模块共享。它通常不涉及具体的硬件操作,而是提供一些基础的功能支持,例如字符串操作、内存管理、数学计算等。

需要注意,我们实现的是printk函数,而不是printf函数,虽然二者很像。

  • printk:用于内核空间,是内核中的一个函数,输出到内核日志缓冲区,通常不会直接显示在用户的终端上。
  • printf:用于用户空间,是C标准库的一部分,输出到标准输出(stdout),通常是用户的终端。

如何理解调用链?

  • 我们要在一个文件中使用printk函数,就必须使用引入include文件夹里的printk.h头文件,至于它是如何实现的并不是程序员需要关心。

  • 当链接器看到头文件中声明了printk函数时,它会查找所有目标文件,找到 printk 函数的实际实现(kern/printk.c 中),并将其与其他部分链接在一起。

  • 在kern/printk.c中实现了printk函数,而printk的实现需要用到vprintfmt函数,这个函数在include/print.h中声明,但是仍然没有实现。

  • 当链接器看到头文件中声明了vprintfmt函数时,它会查找所有目标文件,找到vprintfmt函数的实际实现(lib/print.c 中),并将其与其他部分链接在一起。

可变参数

printk的具体实现中,...代表可变参数,即后面有数量未知的参数。

1
2
3
4
5
6
void printk(const char *fmt, ...) {
	va_list ap;
	va_start(ap, fmt);
	vprintfmt(outputk, NULL, fmt, ap);
	va_end(ap);
}

va_xxx是stdarg.h 库中的宏,stdarg.h是C标准库,我们在路径/usr/lib/gcc-cross/mips-linux-gnu/12/include下可以找到这个文件,具体实现细节比较复杂,笔者也没有看懂,感兴趣的可以自行研究。

  • va_list:用来声明一个变量,用于保存可变参数的列表。

  • va_start(va_list args, last_fixed_arg):初始化 va_list 变量,告诉宏从哪个固定参数开始提取可变参数。last_fixed_arg 是在参数列表中的最后一个固定参数。必须调用 va_start 来初始化 va_list,否则无法访问可变参数。

  • va_arg(va_list args, type):访问可变参数列表中的下一个参数。type 是你希望获取的参数类型,每次调用 va_arg 后,指针都会向后移动。

  • va_end(va_list args):用于结束对可变参数的访问。调用完 va_arg 后,必须调用 va_end 来清理资源。

结语

lab1的课下练习,如果仅仅是完成填空是很容易的,但是如果要理解内核中的每一行代码在干什么是一件很费时间(同时也很有趣)的事情。希望同学们能够保持好奇,不仅仅拘泥于完成练习,积极探索操作系统的魅力。

Licensed under CC BY-NC-SA 4.0
最后更新于 Mar 21, 2025 17:00 UTC
comments powered by Disqus
使用 Hugo 构建
主题 StackJimmy 设计